Here Comes the Sun, Little Darling

Two weeks ago, I was counting down the days until my wedding. Today, I’m sitting back, slowly reclaiming my apartment from the piles of stuff, and enjoying a week of being one half of an old married couple.

In the days leading up to the wedding, I baked and baked and fretted about the weather and baked some more. I had my whole family here, and some of my best friends, and with their help, we were able to put together all the treats, make all the favors, assemble all the supplies, and construct all the bouquets. It was a whirlwind, exhausting week, with a few stressful moments, but by the time Saturday rolled around and our music started, the sun came out and everything was alright.

I won’t bore you with too many details, but I wanted to share some pictures from the day, captured by some of my friends and family. It really was the most perfect.

Photo courtesy Sara Thom Photography

Photo courtesy Sara Thom Photography

I made dat cake. It was yum.

Clay’s face in this is just my favorite.

It’s the Final Countdown

Well, folks. It’s nearly here.

Wedding Week.

Photo courtesy Sara Thom Photography

This time next week, I’ll have had a rehearsal dinner, a bachelorette party, made bouquets, baked and decorated a wedding cake, and probably overthought literally all the things. Only one thing will be left: the actual getting married.

It’s hard to believe that it’s already here – but at the same time, I feel like… “damn, it took FOREVER to get here.” Mostly because I’m impatient and excited. I’m also really ready to just enjoy all of the things we’ve spent the past few months poring over and thinking about.

I’ve spent the last month or so eating Whole30 (the last week has been a little bit less strict, since I finished my 30 days last Wednesday), trying to run everyday (I’ve had a couple days, two exactly, where my body said “hey dummy, you need to rest,” so I did.) I feel healthy and strong and not too stressed – the workouts really help with that – and I’m hoping that feeling can carry me through the next week.

My house, on the other hand, is kind of a disaster – the wedding is taking over any free space we had. The closet? Cram-jam full of favors and decor and a dress and shoes and little extras. The laundry room? Currently housing half of our alcohol supply. The living room? Holding the other half. It’s almost comical – but every time I see these things, I get excited about finally being able to put all the pieces together.

I know that the next week will feel a little crazy and I’m probably going to forget something important (or not important), but at the end of the day Saturday, it won’t matter. I get to celebrate with my guy and my friends and my family and that’s the most important part.

So now, I just have to make it through a weekend of work, and it will be full steam ahead to party time!

Cheers!

My make up trial went really well – I’m lucky to have friends that know what they’re doing with that stuff… considering I wear mascara. And that’s it.

Heels at an outdoor wedding seemed dangerous to me, so I opted for sparkly sneaks. I think I made the right choice.

Just this little sneak peek for now… but stay tuned for more after next week! Eeeeek!

I’ve baked more cake in the last six months… but I think I’ve perfected my recipe and I’m excited to do it for real next week!

#WeddingWednesday: DIY Wedding Day Music

I’m DJ-ing my own wedding.

roomba

I wish DJ Roomba would play my wedding.

I thought this would be pretty easy – I’m a musician, Clay is really a musician, we love a wide variety of tune-age. Finding songs that we like should be no problem, right?

Well. Kind of.

As it turns out, we both have pretty strong criteria for our playlists and while we like many genres and styles of music, it’s hard to sift through that many songs! And, we don’t want any of our ceremony music to feel cliched – because as pretty as Pachelbel’s Canon is, I am not walking down the aisle to it. Nope. (Not judging anyone who has used that piece, I’ve just played it one too many times, and the cello part blows.)

It’s also tricky to pick all of your own music for not only the ceremony, but also for dinner and dancing. That’s a lot of moods and styles to figure out and balance. (And let’s be honest, I really just want to dance.)

Basically, the Bravermans are #goals

Basically, the Bravermans are #goals

Needless to say,  I have a large spreadsheet mapping out our current favorites and ideas. The dancing and dinner portions of the evening don’t seem to be giving me as much trouble as the ceremony part – which isn’t really surprising, as it is the most personal and is when people will be the most tuned-in to what the music says and how it makes them feel.

Consequently, that means that I am over-thinking this portion like whoa. Because I want to avoid cliche, and I want the ceremony to be true to our music style, I’m finding myself wading through all of my favorite music and getting seriously distracted. “Oooh, I like that!” “OH! I like that too.”  “Dave Matthews needs to be in here somewhere” “Also probably Paul Simon?” “HOW COULD I FORGET JOHN WILLIAMS?!”

You see my problem.

Fortunately, the lovely folks at Wedding Paper Divas have a super helpful tool to help with this kind of indecision. Their Wedding Song interactive is categorized by event within the wedding day, and then browse-able by genre and decade.

screen-shot-2016-11-28-at-8-58-46-pm

I spent about twenty minutes poking through their selections for processionals, as that’s where most of my indecision has been, and I was pleased to find a song I didn’t know existed that now I want to use! Who knew that John Mayer covered Beyonce’s “XO”? Okay. Clay knew. But I didn’t, and I’m kind of obsessed with it.

I’m really looking forward to continuing to play around with this tool as we build our playlists for Wedding Day – there’s still a lot of fine-tuning to do and this will be a great resource to inspire us.

What are some of the most unique wedding songs you’ve heard? Best? Worst?

Scoot Stitches Sewing Tutorial – Race Shirt to Gear Bag

ScootStitchesLogo2

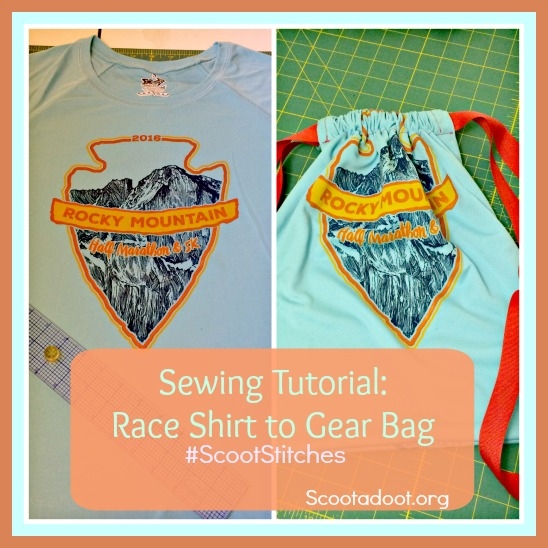
I’m guessing you have a TON of t-shirts laying around. As runners, we accumulate them like we accumulate safety pins. That’s why I thought a tutorial on how to make a gear bag out of a race shirt would be a great Scoot Stitches first project. When I floated the idea by Meri and our Facebook and Instagram friends, they all agreed! So here is a super simple project that is perfect for the first time sewist, and is even kid friendly (with supervision and help, of course). I’ll let you know when I think up some ingenious use for the safety pins beyond the norm. 😉

This project is easy, it took me an hour, and honestly, I didn’t really measure  or get too exact on this one. And that’s the point, don’t over think it. It’s just a bag, keep it fun and have fun with it. if you mess up, who cares? You’ve got plenty of shirts in the dresser, right?

scootstitcheslesson2

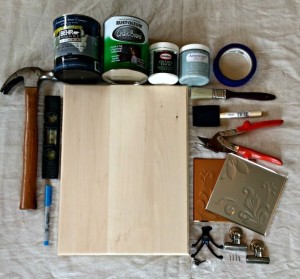
Supplies: Race shirt, 1 spool of thread (if it matches in color, great, if not, it’s cool), scissors or rotary cutter, straight edge/ruler, straight pins, fabric marker or chalk, 1 three yard spool of 1 1/2 inch wide ribbon, sewing machine, Stretch Sewing Machine Needles (see step 3).

Step 1 -Read these instructions all the way through before starting.

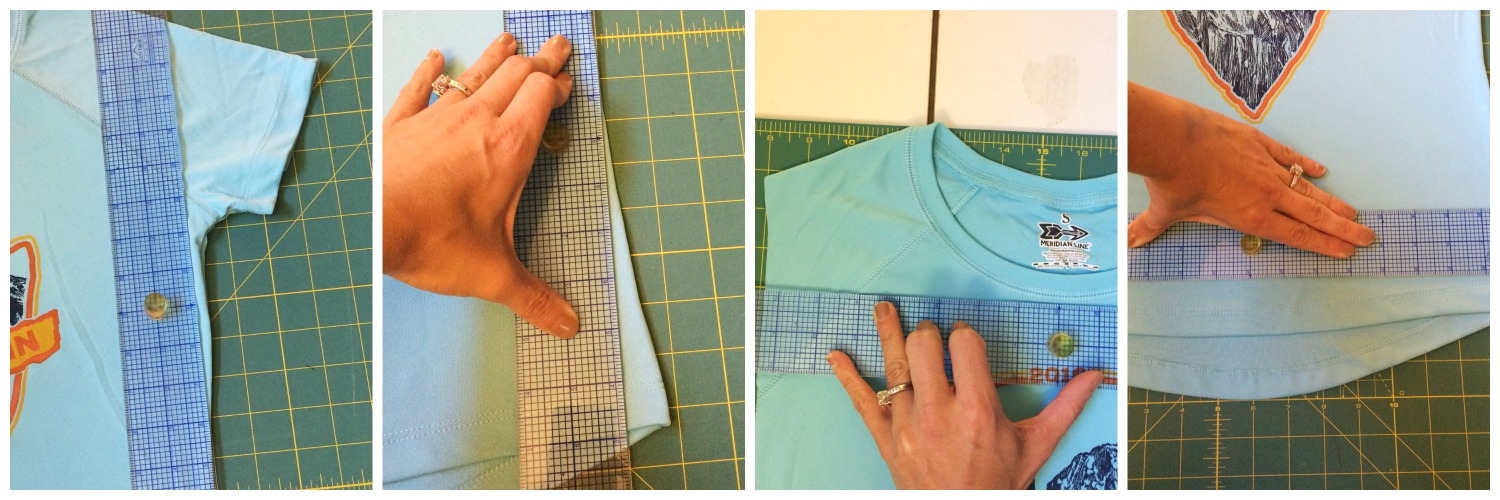
Step 2 – Cutting the Panels First, you’re going to cut your shirt to make the two panels for the bag. Here are two methods depending on the tools you have:

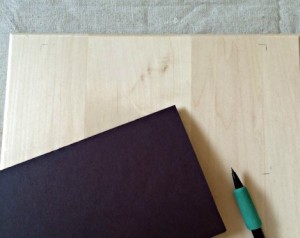
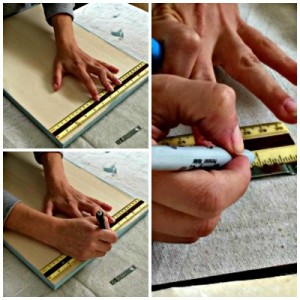
Scissors and Fabric Marker Method: Lay your shirt out flat making sure there are no wrinkles. Lay the ruler along one side, matching it to the seam and the top of the shoulder (see pics below). Draw a dotted line long the right side of the ruler. Using pins, pin the two layers together just inside the dotted line to keep them in place. Repeat this on the other side seam, the top just below the collar, and the bottom.  Next, cut along the dotted lines. After you have your rectangle shape, take out the pins along the top, but leave the rest in.

step1

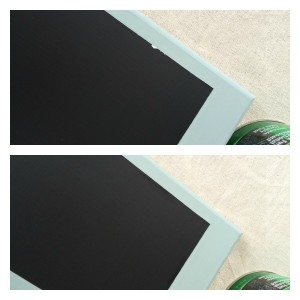
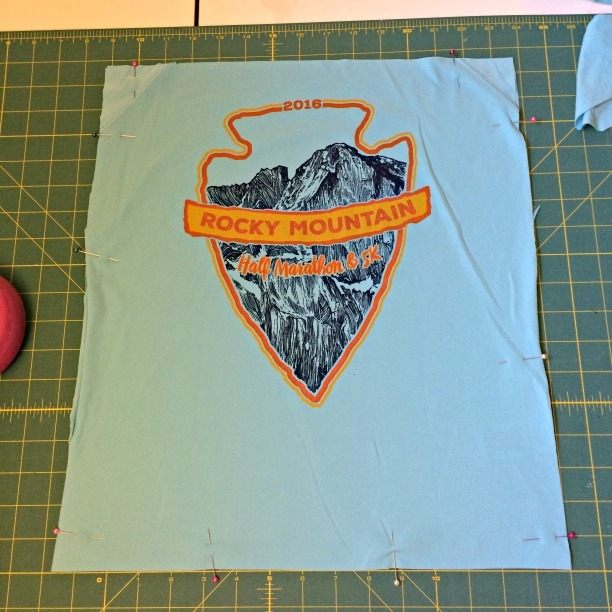
Rotary Cutter Method: Line up your ruler as shown above, and cut along outside edge. Once cut, pin.step1a
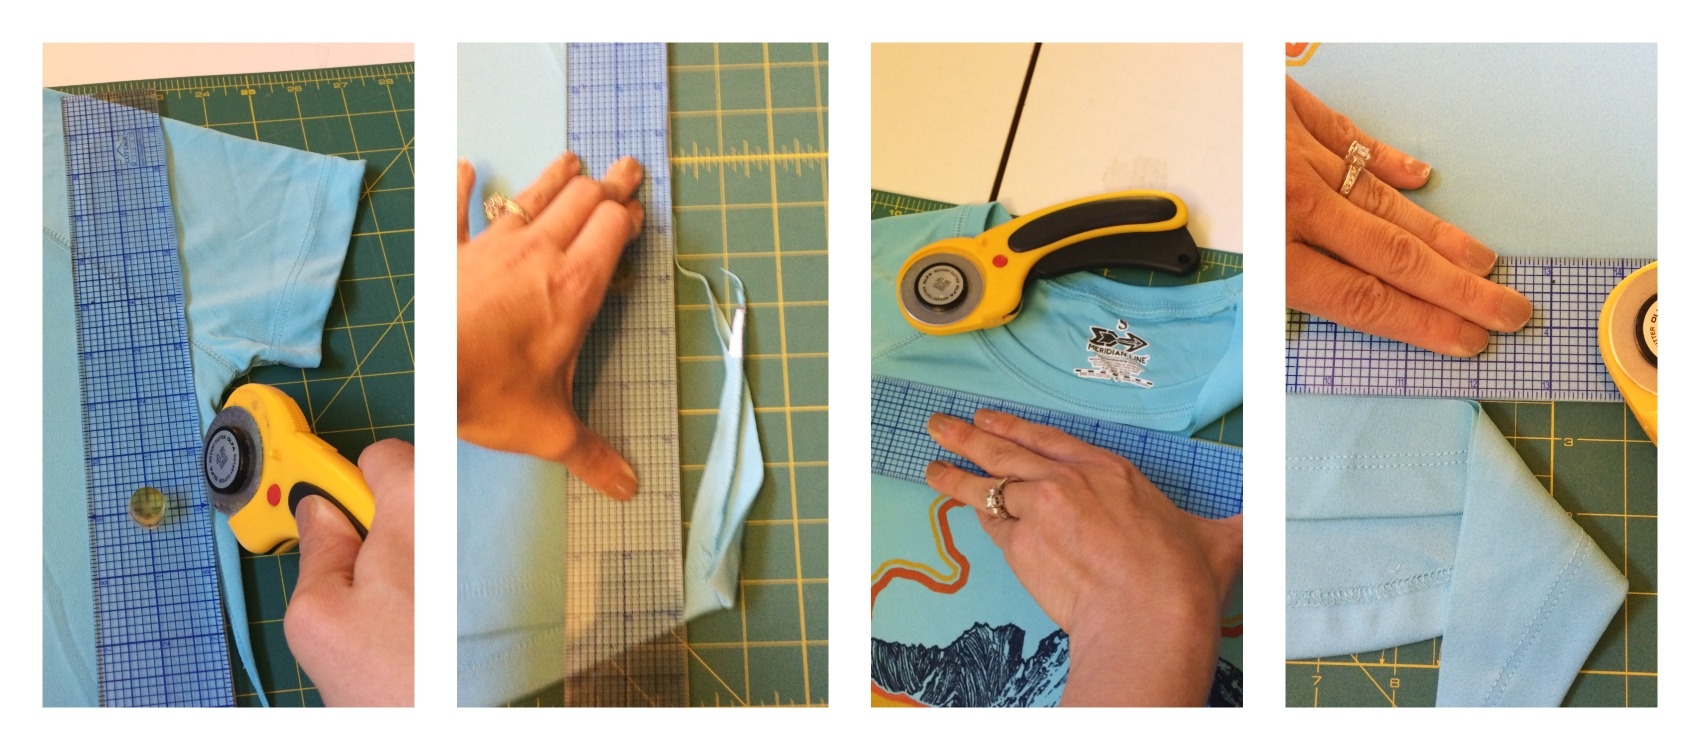
When you’re done, it should look like the photo below; all squared up and ready to stitch! **Note if working with a larger sized shirt, you may want to trim the sides and bottom to make a more narrow rectangle. DO NOT trim from the top, you need that extra fabric for a later step.

step1b

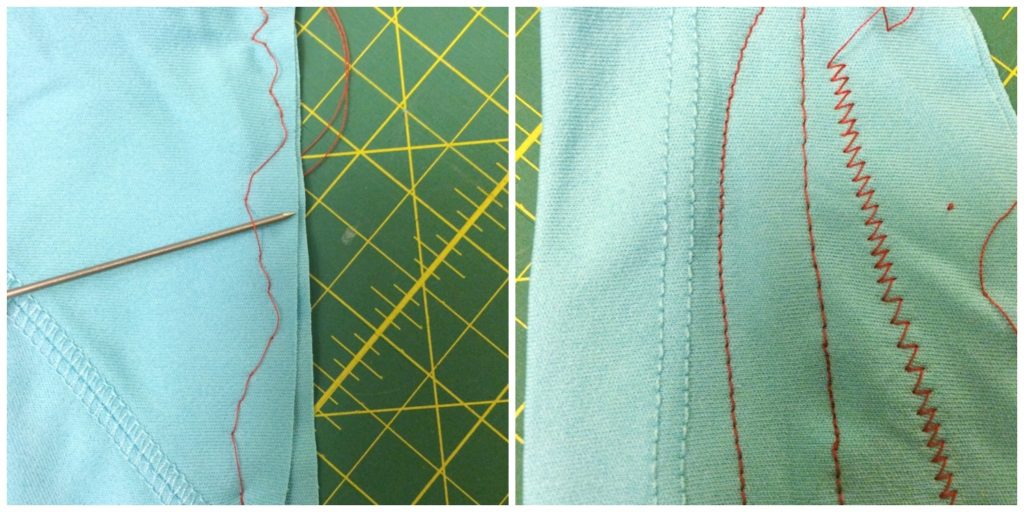
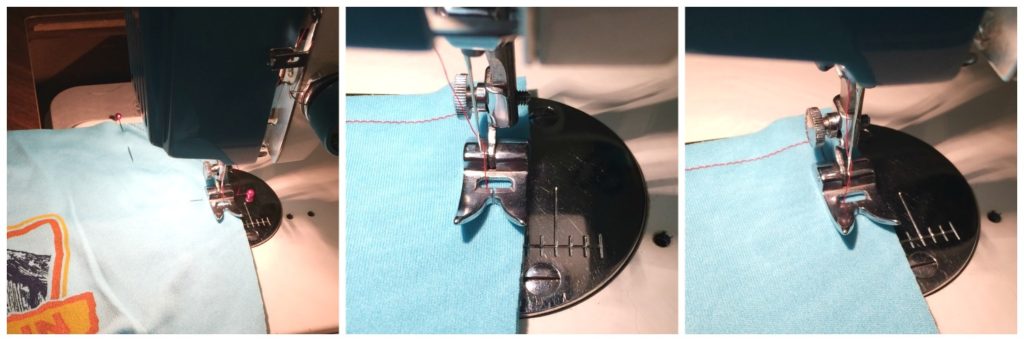
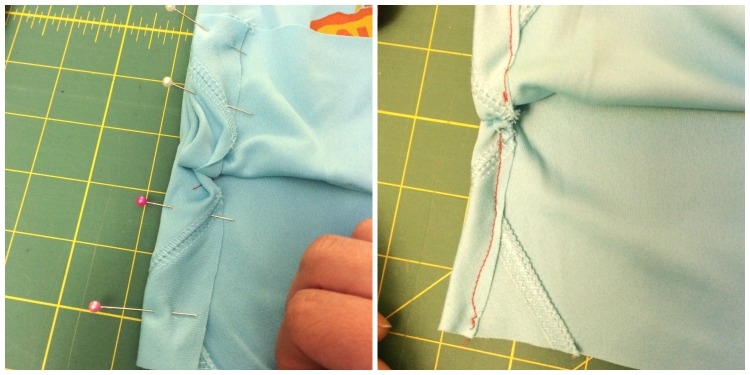
Step 3 – Practice Stretch Stitching Make sure you are using a stretch sewing machine needle for this project, and adjust your machine to stretch stitch settings (refer to your manual, or use a zig-zag stitch if you don’t have a stretch feature). Using some scraps that you cut from your shirt, stitch some practice seams to make sure your needle is catching the bobbin thread and sewing properly. With the practice swatch on the left, I used the #75 stretch needles, and my machine was skipping stitches. After I switched to the #90, I got the results I wanted. The right needles make ALL the difference.
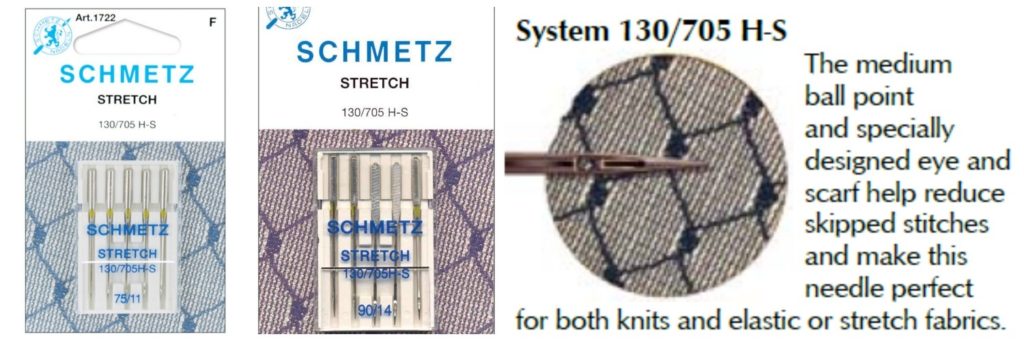
stitches

needles

Helpful Info!

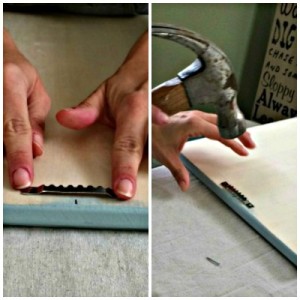
Step 4 – French Seam A French seam will keep the fabric from unraveling on the inside of your bag.  With the wrong sides together, start stitching 3 and 1/2 inches from the top and stitch the sides and bottom with a  1/2 inch seam allowance (I use the edge of my foot for a guide).

step2

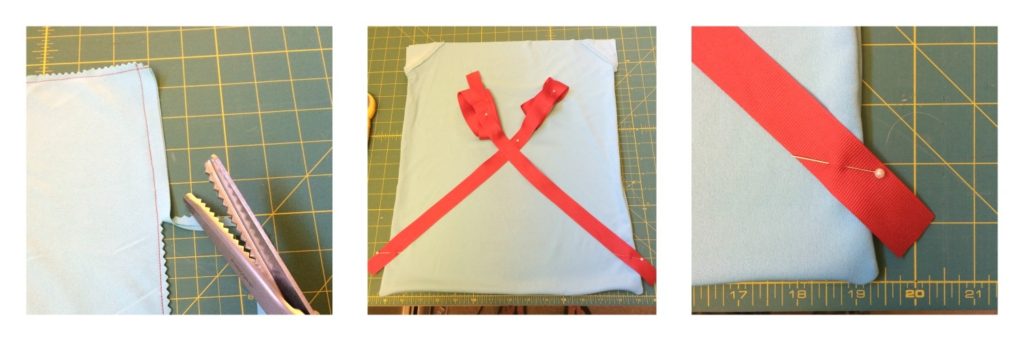
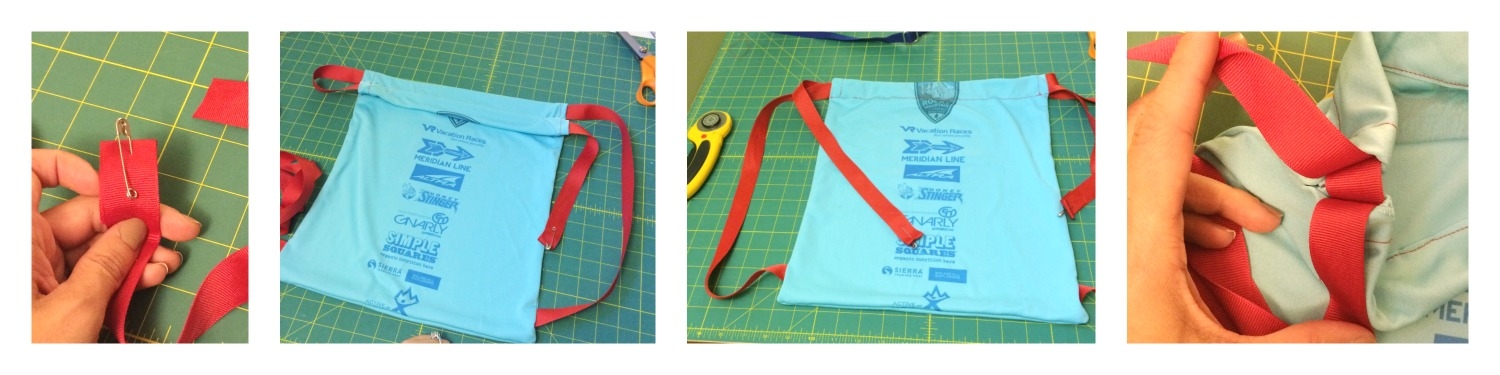
Trim off the corners and excess fabric. You should now have something that looks like a pillowcase. On the back panel, measure 2 1/2 inches from the bottom and mark that spot with a marker or a straight pin. Next, take your ribbon and cut 2, three-ish foot lengths (this is where I kinda eyeballed it). Match one end of each ribbon at an angle to the marks on each side and pin in place. I looped and pined the extra ribbon to the center just to keep it out of the way. Trim the ribbon so its edge lines up with the bag (I didn’t snap a photo of that, but you get the idea).

straps
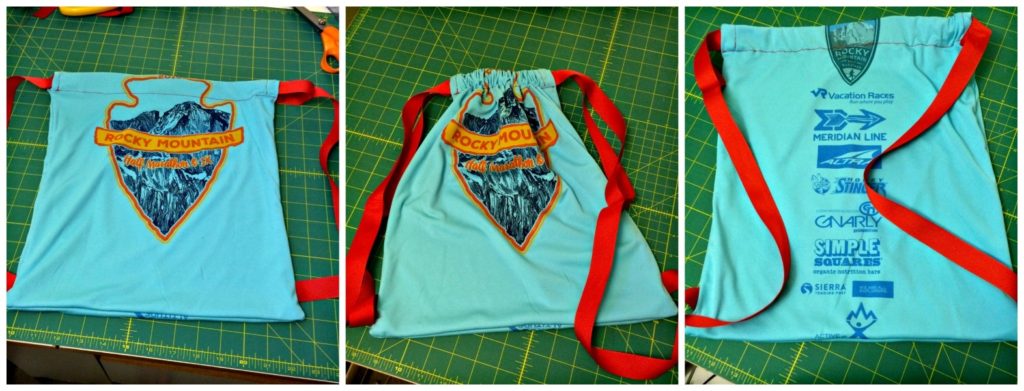
Next, turn it inside out so that the shirt graphics are on the inside,and stitch the sides and bottom again just like before, only this time, do a 5/8 inch seam allowance. Stop stitching 3 and 1/2 inches from the top. When you turn it right side out, it should look like the photo below.straps3

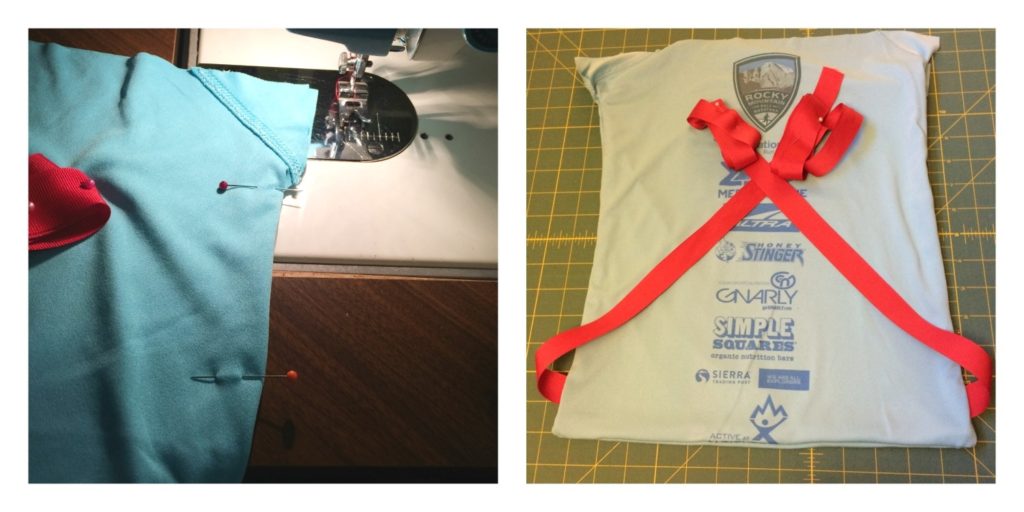
You are almost done, can you believe it!?!? It’s starting to look like a bag, so pour some wine to celebrate your accomplishment! YOU ARE EPIC.

Step 5 – Make the “Casings” The casing is that part at the top where your ribbon is going to go through. Turn it right side out so the graphics are on the outside. Fold the raw edges over once, pin and stitch each flap. Repeat on other side.

casing1

Then, using the ribbon as a guide, fold over the flap and pin, making sure it’s wide enough for the ribbon. Stitch as shown (note, you’re NOT sewing the ribbon in, you’re just making a pocket for the ribbon).

straps2

Step 6 – Thread the Ribbon  Starting on the right side, fold the ribbon over once and pin a safety pin through both layers. The larger the safety pin, the larger the better, but even a bib safety pin will work. (Yay, we used them!) Feed the ribbon through the casing from the back to the front. Repeat on the other side feeding the ribbon from front to back.

ribbon

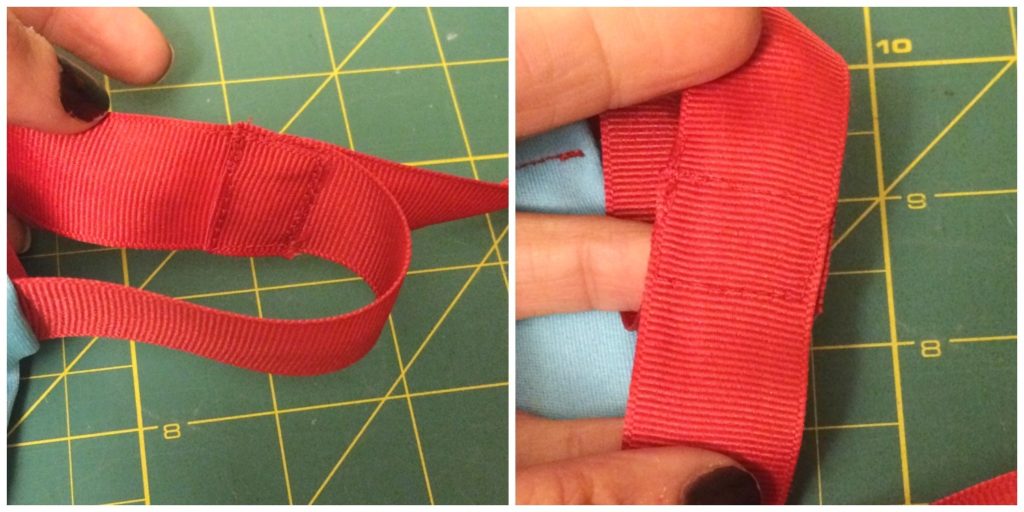
The last thing to do is to trim off the extra ribbon, fold over the cut edge, and stitch the loose ends as shown below.

secureribbon

And you are finished already!

all-done

Outcomes: You just learned three major sewing techniques!!

Drawstring bag construction: If you skip the step of sewing the ribbon to the bottom of this bag, then you’d have yo’self the basis for a laundry bag, make-up bag, evening bag, a washing bag for unmentionables, or whatever else you can put in a bag.

Casings are used in all kinds of applications from elastic waistbands to roman shades. Chances are excellent you’ll use this again.

Lastly, the advanced couture French seam. LOOK AT YOU GO. They are handy when you don’t have a serger machine (visit www.stitchandsew.net/best-sewing-machine for more details), but are working with a fabric that will fray, causng your seams to come apart. That’s why we used it here. It encases the raw edges of the fabric to prevent unraveling at the seams. French seams are also handy if you need to alter the size of a garment. That’s why you usually only see a French seam in wedding gowns.

So that’s it for this lesson. I hope you enjoyed this easy project. Share your finished bags with me on social media, I’d love to see them! Tag your pics with #scootstitches.  If you have questions about the tutorial, you can email me at scootadoot@gmail.com.

Get out there and get crafty!

Save

Save

Save

Save

Save

Save

Save

Save

Save

DIY Wedding: Cakes!

This time last year, I was blogging a lot about marathon training. And running. And lifting.

This year? There’s almost no running to speak of. I don’t have a race to train for and I’m enjoying finding all of the other ways my body can work – and trying to maintain a balance between work and extracurriculars and life.

I’m also knee-deep in wedding planning, which is proving to be a whole other adventure, let me tell you. A fun adventure, but definitely an adventure.

Because my fiance and I are trying to keep or wedding simple and small, and because we’re working with a very modest budget, we’ve decided to DIY a lot of it. Flowers, music, booze, desert, maybe even my dress. Fortunately, having a small wedding means that coordinating all of this won’t be terribly outrageous.

The thing I’m the most excited about DIY-ing though? The cake! I love to bake and while I had never made a wedding cake before, I felt pretty confident in my ability to figure it out. I’m no professional by a long shot, and I’m not even that well-versed in decorating, but I am preeeetttyyy good at following instructions and my Pinterest project success rate is super high.

In addition to baking a lot of cookies and bars and other treats, my primary preparation for this project has been to watch way too much of The Great British Baking Show (which is arguably the best show on television, and if you’re not watching it, what’s wrong with you?).

So, two weeks ago, while home alone for the weekend and having the kitchen to myself, I decided to get started. This is how much cake baking I haven’t done in recent years: I didn’t even own a cake pan. I went out and secured a couple cake pans and got to work.

So. Much. Butter. In. Here.

So. Much. Butter. In. Here.

This batter is so light and fluffy and YUM.

I started with a simple vanilla butter cake recipe, but I didn’t have the called-for cake flour, so I just forged ahead with AP flour and kept working. I also thought to myself “hey self, you’ve never tried to make fondant before, why not try now, since you have all of the ingredients.” I wish I’d thought to take pictures of THAT hot mess, because whoa. The mess was real. Melted marshmallows and powdered sugar literally everywhere in my kitchen. And then I threw together some vanilla buttercream frosting. The end result didn’t turn out half bad.

IMG_2878

The cake was slightly underbaked and a little bit more dense (thanks, AP flour), but the taste was great and everyone in my office who got to taste test enjoyed it.

For our second trial, I decided to play with flavors and still not worry too much about decorating or overall aesthetics. This time, I opted for some blueberry jam as the filling along with almond buttercream. No fondant this time and to keep it simple, I just did one size cake.

IMG_2914

I had actual cake flour this time around, so the crumb of this bake was a little looser, but the taste was just as good and stayed just as moist. The almond buttercream was a big hit and Clay (who famously doesn’t like cake) asked for an even bigger slice than the test one I gave him. He thought that there could be more blueberry – I tend to agree.

As the wedding gets closer, there will be more test bakes with a few more flavors and a greater attempt at decorating. Ultimately, I want a naked or semi-naked cake, so I’ll be working mostly with fruits and flowers to decorate. I’m still looking for other cake recipes, so if anyone has any reliable ones, I’d love to try them!

Scoot Stitches – Lesson 1, Machine & Tool Basics

Types of Machines stamp

This is it, the first lesson in Scoot Stitches Sewing School. We’re happy you’re here and we hope you enjoy the lesson! YOU CAN DO IT! Let’s get started…

Aside from a few shakes of the tripod and a lovely view of my shoulder (sorry about that, I ran out of time to re-film), I think this went swimmingly! Please let me know if you think so too. Get to practicing and let me know if you have questions. Tweet us, Facebook us, or email me at scootadoot@gmail.com. Thanks again for watching. See you next time! #scootstitches

ScootStitchesLogo2

Announcing Scoot Stitches Sewing School

We are super-duper qua-triple excited to announce a brand new feature on the blog!

ScootStitchesLogo2

That’s right! Next month, we’re launching an ongoing series of sewing tutorials with a focus on equipment, basic sewing skills/techniques, and making running costumes.  Some installments will be in video, some will be text posts with photos, some may even end up on Periscope!

The best part is we REALLY want to hear from you! Have you seen costumes on Facebook and wished you could be that crafty? Did you inherit a sewing machine and wish you could use it but don’t know where to start? We can help! Tweet, Facebook, or Instagram your questions and requests with hashtag #ScootStitches and we’ll cover it for you in the series.

It doesn’t matter if you’ve never sewn a button or if you’ve made your own tent (kidding, only my amazing mom has done that), you’ll learn something from us Chicks. We’ve got over sixty years of combined needle-wielding experience here.

I promise you that you can make anything you’ve seen us make on this blog. We’ll teach you how. You CAN do it!

The first lesson will post 5/11 and cover sewing machine info like what all the knobs and settings do, basic care and feeding, and how to thread the darn thing.

In the meantime, check out our past tutorial on how to make a running skirt with a waistband pocket.

Don’t be shy, send us your questions and requests on Facebook, Twitter, and Instagram using #ScootStitches. We love emails and comments in our posts (below), too!

Show ‘Em Your Rack, A Tutorial

A while back, I posted about my plan to make a medal rack and share it with you, and this weekend, the planets finally aligned to allow me the time to get my craft on. Of course, there are a few things that always make DIY projects better.

Things like a snowy morning.

snow

And Colin Firth as Mr. Darcy.

It is a truth universally acknowledged that Colin Firth IS Mr. Darcy.

So, now that we’re all in agreement on that, let’s proceed, shall we? Here’s what you’ll need for this project:

supplies

Supplies:                                                                                                                                                                                   

Wood plaque of your choice                                            Chalkboard Paint                                                        Magnetic Clips

Primer                                                                                       2 Coat Hooks                                                                 Aluminum or Tin Strip

Paint Tinted color of your Choice                                Picture Frame Hook and Nails

Tools:________________________________________________________________________

Hammer                                                                                  Ruler                                                                              Level

Pencil                                                                                       Marker                                                                           Sandpaper or Sanding Block

Drill  or Screwdrivers                                                       Painter’s Tape                                                             Bristle Paintbrush

Foam Tip Paint Brush                                                      Fine Tipped Paint Brush for Touching Up

______________________________________________________________________________________

Step 1: Using a fine grit sandpaper or sanding block, lightly sand any rough areas on your wood piece. Pay attention to edges and corner in particular.

Step 2: Using a piece of paper, make a template for your chalkboard area to help you decide where you want it on your plaque. Once you have decided on placement, mark the corners with a pencil.

Step 2

Step 3: Using a ruler and pencil, outline the desired area. Make sure your lines are straight and centered. Tape off the inside of your area with painters tape. Later you will paint the inside of your rectangle with chalkboard paint.

step3

Step 4: Paint your plaque with primer. Be careful not to get any in the taped off area. Let dry.

step4

Step 5: Paint over the primer with your tinted paint. Let dry.

step5

Step 6: Paint a second coat of your colored paint. Once it’s dry, remove the painter’s tape.

step6

Step 7: Tape off the painted area around your chalkboard area. Paint the bare wood with two coats of primer. Allow each coat to dry thoroughly, and sand lightly between coats. This will help ensure a smoother writing surface once the chalkboard paint is applied.

step7b

Step 8: Apply two coats or chalkboard paint, allowing each coat to dry completely between coats.

chalk1

Step 9: After the chalkboard paint is dry, remove the tape. Touch up any areas with a small tipped paint brush if needed.

chalktouchup3

Step 10: Affix the tin strip (or pieces, as the case may be). Decide where you want your bibs to hang, and using a pencil, outline the strip. Nail in place. I had some tin tiles laying around my house, and used tin snips to cut them to the desired shape and size.

tin Collage

Step 11: Affix the picture frame hanger on the back. First, find the center of your plaque and mark it with a pencil. Then, find the center of the hanger and mark it with a marker. Next, align the two marks and nail your hanger to your plaque.

hanger collage

Hanger Collage 2

Step 12: Affix your medal hooks. Decide where you want them to go, and mark the screw holes with a pencil. It’s easier to start the holes using a drill and a bit. Using the hardware that came with your hooks, attach them to your plaque.

hooks

hook Collage

Step 13: Celebrate because YOU ARE DONE. And you rock! All that is left to do is hang your new medal rack. Then, attach your bibs to the clips and hang your bling from the hooks. Look how awesome you are!

I had my magnetic clips a little crooked in this shot, but you get the idea.

I had my magnetic clips a little crooked in this shot, but you get the idea.

finished Collage


I am loving how this project turned out. Now, I just need more medals to hang from it!

How do you display your medals? Have you made your own rack, or anything else, for that matter? Tell me all about it in the comments!

Show Me Your (Medal) Rack!

The medal is one of the best things about racing, right? We work so hard for them, and they represent our big accomplishment. I don’t know about you, but if I had 5 minutes to evacuate my house, my medals are coming with me. It’s only right that they are given an honored place in our homes and are handsomely displayed. Just like our dreams should be.

Cam's Wall of Triumph

Cam’s Wall of Triumph


Meri's bib board (a few years back)

Meri’s bib board (a few years back)

But my two half marathon medals deserve a nice rack on which to be proudly displayed. Currently, my two medals are in my office at work, hanging from a coat hanger.

It's tragic.

It’s tragic.

Since I like to make stuff I’ve decided to make a rack myself. I went to Michaels today and got a nice 12×16 wood  blank plaque that I can do whatever I like to!

And a coloring book because of reasons.

And a coloring book because of reasons.

The thing is, what to do? I found some inspiration (thank you, Pinterest), and imagine I will incorporate some of these elements into my rack.  I love this one because you can use any old shelf or hard surface since you’ll cover it with the bibs using Mod Podge. We love upcycling!

holder1

This one I liked because it’s so beautiful you could display your bling anywhere in the house!

holder3

I will probably end up using a little chalkboard paint because I like having the option to track times or to just write myself a note to stay motivated.

holder2

I can’t wait to get started on this project! I’ll share the progress in Instagram, but please share photos of your rack. Or pile. Or coat hooks. Lemme see what creative ways you’re honoring your bling!